
How To Create Bootable USB to Load OS like XP
As we have seen we boot OS ( Operating System ) like windows XP, Win7, Win8 from CD's or DVD's. But now i am going to show you how to Boot OS from USB Drive/Flash Drive. And also tell you the advantages and disadvantages in the bottom of the post.
Things Required:
1) Rufus_v1.2.0 (Click here to download)
2) Operating System ISO image file.
Here below are the steps to be followed after downloading Rufus:
1) Double click on rufus_v_1.2.0.exe file.

2) Browse for the OS file.
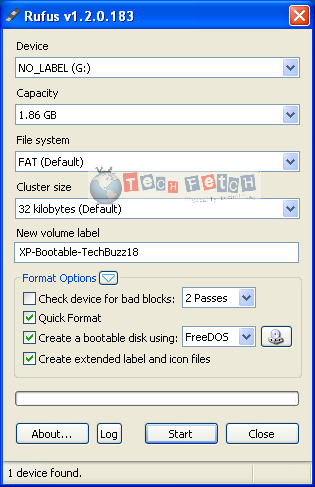
3) Select the ISO file
4) Click on open

5) All the files will be scanned to check if the files are valid or no. Once the scanning is complete click on Start.

6) Once you click on start you will be prompted by a dialog box which is asking to format your USB Drive/Flash Drive. Click OK.

now the flash drive is being formatted and necessary files are being created once completed it will start to copy files from the ISO file into USB Drive/Flash Drive.

Files are being copied from ISO to USB Drive/Flash Drive.

7) Once the coping is completed click Close.

The whole process for me it took about 22 minutes.
Then In BIOS -> Boot Disk Priority -> select the First Boot Device -> Removable Disk and save and exit.
- in some BIOS it will be listed under HDD.
- in some BIOS it will be listed under Removable Disk.
Now let me tell you some advantages and disadvantages.
Advantages:
- Booting process from USB Drive/Flash Drive is faster than CD/DVD.
- No worries of Scratches.
- Easy to carry.
Disadvantages:
- If virus is there in system then flash drive will be infected
- Files inside the USB Drive/Flash Drive can be modified.
Note:
- Always use the USB drive only for booting process.
- Never insert it into the system which is affected by virus. This may affect your OS files inside your USB Drive.
Thank you... and all the best.
Comments are welcomed.
Paytm - Online Recharge via ATM Credit/Debit Card

Have no time to go to a Mobile shop or an outlet for Mobile Recharge like Aircel, Airtel, BSNL, Idea, Loop, MTNL, MTS, Reliance GSM, Reliance CDMA, Tata Docomo GSM, Tata Docomo CDMA, Uninor, Videocon, Virgin GSM, Virgin CDMA & Vodafone, or you want to book a Bus Ticket from to anywhere in india and want to see how many seats are booked and free seats then this is the website you must go for. (website on end of this post)
Apart from this you can also recharge for the following:
- DTH Recharges (Airtel Digital TV, Reliance Digital TV, Sun Direct, Videocon d2h, Dishtv, TataSKY)
- DATA Card Recharges (BSNL Datacard, Reliance NetConnect, MTNL Datacard, Tata Photon +, Tata Photon Whiz, MTS MBlaze, MTS MBrowse)
- Mobile Bill Payments (Airtel, BSNL, Tata Docomo GSM, Idea, Loop, Reliance CDMA, Reliance GSM, Tata DOCOMO CDMA, Vodafone)
- DATA Card Bill Payments (Reliance NetConnect, Tata Photon +, Tata Photon Whiz)
- LandLine Bill Payments (Airtel Delhi)
- Electricity Bill Payments (BSES Yamuna, Reliance Energy, MSEB - Mumbai, NDPL)
- Toll Card Recharges (Delhi-Gurgaon Toll)
- Gas Bill Payments (Mahanagar Gas)
Since its a world of technology and everything need to be easy and just one click, i recommend you to use PAYTM website for mobile recharge, and other payments. Safe and Secure.
Website Link : www.paytm.com
we would like to hear from you. please comment below if you have any questions or doubts.
Testing Your Internet Speed
Did you know what speed your Internet Service Providers (ISP) provide, or have they promised you high speed but you are facing low speed. Then here is a site for you to check the speed of your service providers.
Step1: log on to www.speedtest.net
Click on " BEGIN TEST " and wait for some time till the testing is complete. it may take about 30 - 40 seconds
Screenshot of the page is below:
1- Ping
2- Download Speed
3- Upload Speed

1- Ping : this in technical terms is the time taken for delay to communicate from one computer to another over network.


How To Manually upload files and folders to Google Drive - Technology Explained

If you have important files that you want to be able to access anywhere and anytime you sign in (including images and videos), you can manually upload them to Google Drive. You can also save time by uploading a folder, which will keep the original folder structure and upload all of the individual files within it.
****With Screenshots Available Below****
How to manually upload files
There are two ways to manually upload files to Google Drive:
- Drag-and-drop files. If you are using the latest versions of Chrome or Firefox, you can simply drag-and-drop your files directly from your computer into Google Drive at drive.google.com. For all other browsers, follow option two.
- Upload files through Google Drive. From the Google Drive web interface, you can follow these steps to manually select files to upload:
- Open drive.google.com.
- Click the upload
button and select Files... from the drop-down menu.
- Select the file you'd like to upload. To select multiple files, press Shift or Ctrl and click all the files to upload.
- Your file will appear in “My Drive.”
How to manually upload folders
There are three ways to upload folders to Google Drive:
- Drag-and-drop folders. If you are using the latest version of either Chrome or Firefox, you can drag a folder from your desktop into Google Drive at drive.google.com. The folder will then begin uploading immediately along with its individual files and original sub-folder structure.
- Upload files through Google Drive (using Chrome). From Google Drive in Chrome, you can follow these steps to manually upload a folder:
- Open drive.google.com.
- Click the upload
- Select one or more folders to upload. All files and sub-folders within that folder will also be uploaded.
- A box that indicates the progress of your folder upload, as well as a list of the files being uploaded, appears in the bottom right of your Google Drive.
- When you're done with your upload, you can click the link to open the uploaded folder in Google Drive or close the box by clicking the x in the upper right corner of the box.
- Upload files through Google Drive (in a browser other than Chrome). From Google Drive in browsers other than Chrome, you can use the following steps to manually upload a folder. You will need to enable folder upload in these browsers each time you visit your Google Drive:
- Enable Java in your browser.
- Confirm that Java is enabled by visiting the Java test page.
- Install the Java applet.
- Click the Upload button in Google Drive and install the Java Applet when prompted.
- A security dialog will open asking if you want to allow an applet to run. Install this applet. Note: The applet will be signed by Google Inc.
- Complete steps to upload a folder as you would in Chrome (outlined in the steps above).
Screen Shots:
 |
| 1. Click on Upload to Upload Files or Folder |
 |
| 2. Select Files or Folder |
 |
| 3. Select the File or Folder Location |
 |
| 4. Uploading of File or Folder in Progress & Final Process |
 |
| 5. Once Upload is Complete and if you like to share with others Click on Share and then in Invite Peoples enter the email ID of the user you would like to share |
 |
| 6. if you dont like to share via email then choose Public on the web / Anyone with the link.. which doesnot require email id. then click on save |
 |
| 7. This is Drag and Drop ( one of the easiest method), if you have any files or Folders then directly drag and drop inside google drive. |
Mobile Web Server PAMP - Just like XAMPP


Greetings users,
As far as we know that we host websites via Computer using IIS ( Internet Information Service ) , XAMPP ( Cross Platform Apache MySQL PHP PERL )and so on.. Now its even possible to host websites even from our mobile handset YES Mobile Web Server - PAMP ( Personal Apache MySQL PHP ) can be used..
Nokia Handsets allow these features.
Here below are the installation steps
Download these applications first:
1) Apache & PHP config files
2) PAMP (Personal Apache MySQL PHP) 1.0.2
3) FExplorer ( Just-in case, its optional )
Installation Steps:
$$$$ All Files Install In Phone Memory $$$$
1) Install " pips.sis " (Already Installed Then First Uninstall And Install This).
2) Install " ssl.sis " (Already Installed Then First Uninstall And Install This).
3) Now Install " pamp.sis "
4) Copy " httpd.conf " File And Paste Into " C:/Data/apache/conf " Overwrite/Replace It.
5) Copy " php.ini " File And Paste Into " C:/Data/php " Overwrite/Replace It.
6) Restart Your Mobile.
7) Go Installed Application And Select " Pamp " After Its Open Click On Option - Start - Pamp "
9) Open Mobile Web Browser & Type " http://127.0.0.1 " Or " http://localhost "
10) Test Ur PHP File At " E:/data/apache/htdocs "
8) You Are Done...
Note:
1) If You want to access local website like " http://127.0.0.1/techbuzz18 " then create a new folder inside " E:/data/apache/htdocs " Folder name " techbuzz18 " which will look like " E:/data/apache/htdocs/techbuzz18 " and insert you php or html file inside it.
2) Just in-case if you find installation error like " Unable to install " of PAMP install from this link PAMP.
3) if you face " expired certificate " issue change the date to the year " 2012 ".
Happy Hosting
Access Your PC Remotely - Windows/Linux/Mac

1) VNC
2) NX
3) Remote Desktop Protocol
4) Cross-Protocol
5) Other
VNC
Ajax VNC - Clientless VNC solution in the web's favorite programming language.
Apple Remote Desktop - Apple's jumped on the remote desktop bandwagon with this great VNC server built right into OS X.
Chicken of the VNC - One of the most popular VNC clients for OS X under the GPL.
DirectVNC - UNIX client using the framebuffer device via DirectFB.
FVNC - Great VNC client written in Flash. That's right, Flash.
MetaVNC - This unique client/server package merges the host and remote desktops together into one Windows or Linux desktop.
.NET VNC Viewer - C# viewer that works with Windows and Windows Mobile/CE devices.
PowerVNC - Java-based client with support for SSH and SFTP.
RealVNC - Server/client from the original VNC developers.
sVNC - The perfect tool for offering remote assistance to Mac users, since there's barely any configuring required.
SymVNC - Symbian phone client for connecting to your PC.
TightVNC - Popular VNC server/client with nice Java applet.
TurboVNC - TightVNC spinoff with great support for 3D apps.
UltraVNC - Wildly popular client/server app with file transfer, video drivers, chat, and much more.
Vine Server - OS X server with clipboard sharing, port changing, and a universal binary.
VncViewer for 8086 - Got an old IBM running FreeDOS or DOS? Put it to work with this VNC client.
VNCViewer for PocketPC - Client for, you guessed it, PocketPC users.
x11vnc - Unlike most other VNC servers for UNIX and Linux, this server lets you share your current desktop session (instead of a separate session).
NX
FreeNX - Open source server using the libraries from NoMachine.
NoMachine NX Client - Free client to connect to NX machines.
NoMachine NX Free Edition - NX server for UNIX/Linux.
NoMachine NX Enterprise Desktop - Server that includes everything that the free edition has, but with unlimited users (unlike the free version's two).
NoMachine NX Small Business Server - NX server targeting small businesses.
NoMachine NX Enterprise Server - NX Server with unlimited users and unlimited connections.
NoMachine NX Advanced Server Subscription - Everything that the Enterprise server has, plus multi-node capabilities.
Remote Desktop Protocol
CoRD - Remote desktop client for Mac OS X users.
grdestkop - Gnome wrapper for the rdesktop application.
krdesktop - rdesktop frontend written in KDE.
properJavaRDP - Cross-platform Java client based on rdesktop.
rdesktop - Extremely powerful command-line client for UNIX/Linux.
Remote Desktop - Microsoft's official server, for XP Pro and Vista.
xrdp - Serves an X window session to incoming Windows clients.
Cross-Protocol
Connection Manager - VNC, RDP, and Telnet manager for UNIX/Linux distros.
KDE Desktop Sharing - The official KDE VNC server package.
KDE Remote Desktop Connection - The official KDE client for RDP and VNC.
Kurd - Great rdesktop/vncviewer frontend for KDE.
mRemote - Manage VNC and RDP connections on Windows with this handy app.
RDPMan - A little utility to manage RDP, VNC, and Telnet connections for Windows.
Other
CrossLoop - Easy-to-use remote access utility with file sharing and a multilingual interface.
GoToMyPC - Extremely popular remote access program for ~$25/month.
LogMeIn - Remote access app with a free and a pro ($12.95/month) version with file transfer, remote printing, and more.
Unyte - Nice remote desktop server with a Java applet viewer and IM integration.
Image Source: wikimedia.org
Content Source: Mashable
An open letter to Twitter Inc. by Team AnonymousOpsUSA - Have a look

Content of Letter
" Greetings Citiziens of the World...
Greetings especially to Twitter Inc.
An open letter to Twitter...
Greetings Twitter, The Anonymous collective entity has regarded your site (http://www.Twitter.com) with respect, We have avoided launching Distrubitive Denial of Service (DDoS) attacks and Defacing your site.(To name a few of our most common attacks)
And how did you repay our acts of kindness?
You threw this in our faces----> http://bit.ly/1cY10cx
You have the ability to suspend twitter accounts...
We have the power to suspend websites....
You have suspended the account @Anon_Central
That was unwise Twitter!
You think your website is so secure? Look at some of our recent attacks and then tell us it's secure!
We can tell you this if the Suspended Twitter account @Anon_Central is not returned. You may have to fix a Database leak...
You think because the public labels us "heroes" and freedom fighters that we won't attack your Sites your Servers & your everything?
Think again! We are Terrorist at our very core. One good deed doesn't change who you are does it?
UnSuspend Anon_Central's account or things will get very messy.
For your sake and you sale alone twitter, Do not go against us....
We Do Not Make Idle Threats!
We make promises and we keep our promises
We are Legion
We Do Not Forgive
We Do Not Forget
Expect us...Twitter Inc.
We are Anonymous.
One does not simple TROLL with Anonymous, Without getting totally fucked.
Joint-Press Release Anonymous & LulzSec
Operation BlackFlag
#OpBlackFlag
TWITTER you haven't seen our Black Flag yet!!!
- Team AnonymousOpsUSA & various LulzSec entities "
Source: http://pastebin.com/2cKkzNiN
* Letter Contents are from external site. i am not responsible for it. its just for sharing purpose.


